Monday, May 11, 2015

Final Project Overview


This post will be a combined walk-through and reflection of my final project, an automated toilet flushing device.

Idea
Because the noise of a flushing toilet is so loud, children often get scared when they flush, or do not flush at all. To fix this problem, my partner and I aimed to create a device that, once a child has pressed a button indicating that they want the toilet to flush, will sense whether the child has left the stall or not. If the child has not left the stall, the flush will delay an appropriate amount of time to allow the child to leave. If our device senses that there is no child in the stall, the toilet will flush immediately.

Note: After talking to a director at the preschool, we determined that the appropriate delay time would be ten seconds.

How It Works
Our final piece, from the outside, was an opaque box that could be mounted on top of a toilet tank via suction cups, with only an ultrasonic sensor and a large yellow button visible. Once a child is ready to flush, she or he will push the button. Then our sensor, which is constantly detecting values, will determine whether a child is still in the stall based on a value that my partner and I have programmed into our code (detailed in post "Final Project Week 2"). If a child is detected in the stall, the program will delay for ten seconds and then signal to the motor to run in reverse for ten seconds then run forward for ten seconds. by doing this, a rod-type piece that is attached to the motor of the flushing device we purchased moves up and then down again, like the way that two gears might turn together. This up and down motion lifts a rod within the toilet that opens and then closes a valve, causing the toilet to flush. If no child is detected, the program will operate similarly just without the delay. The program then resets.

Our final piece from the outside.
Our final code.
Thoughts and Improvements: I would have liked to have built the flushing device by hand, and given more time we would have. We did have an original design for how we might do that (detailed in post "Final Project Week 1") but it required way too much force for the motors available to us. However, while we didn't build the device that actually flushes the toilet, it uses many things that we learned in class such as gear trains and converting circular motion to linear motion. I also would have liked to make the code more advanced, and I think that would be a good challenge for a future group to work on. Ideally, the code would be able to say that if a child was sensed, but the child leaves before the delay is finished, it is okay to flush before the end of the delay. Currently our code waits a fixed delay time if a child is sensed after the button is pushed. However, our code certainly still accomplishes everything we wanted our device to do and I'm pleased with the final outcome when we demonstrated our product in class (Unfortunately our prototype wasn't the most audience friendly for a demo because most of what visibly goes on is inside the tank).

Putting It All Together
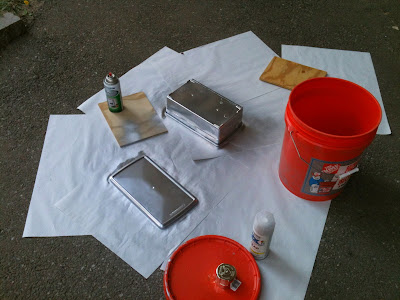
This part of the process was the most fun for me because it was the most hands-on. To house all of our parts (Arduino and breadboard, sensor, button and battery pack) we started out with a clear plastic box. It was important to us that the box be opaque so that the children wouldn't be tempted to go inside and potentially hurt themselves or mess up our device. This is why we spray-painted our box silver (most people thought it was metal from far away, which I thought was neat). Further, we cut holes in the box to house the sensor and the button, which need to be visible from the outside (detailed in post "Final Project Week 3"). Also, because the lid of the box stuck out over the edge, our box sat tilted on an angle when placed on its side. We thought that this might affect the sensor value readings, so to remedy that we glued a thick piece of Delrin to the side of the box, creating a level surface. Then we stuck suction cups on so that an instructor could easily remove the device from the toilet if necessary (we also made it easy to change the batteries). Everything inside the box required a lot of soldering (and re-soldering) to reinforce the bonds between the Arduino and the ultrasonic sensor, button and battery pack. From there we secured all of our parts inside the box and hooked up the flushing device to the toilet tank.

Thoughts and Improvements: Looking back I would have liked to use a box that looked cleaner cut and possibly more compact, just for the purpose of aesthetics. However our design was not messy fro the outside whatsoever and I do not think it would be difficult to install or look out of place in a bathroom. I also wish, although this might be minor, that we had found a way to make the holes in the box look cleaner, but sanding then down was the best we could think of to achieve this.

The inside of our device.
Final Thoughts
I felt that our final design looks simple and is unobtrusive enough to be used in any school — or home, for that matter. The director of the preschool had very positive comments about our product, saying that it could be sold in stores, which is an encouraging response. During the demonstration our product worked exactly as it should and even though is was difficult for the audience to see this, I'm actually pleased that the motor is so quiet, as this is an added feature of the product. Other than the improvements I suggested above, I am very pleased with the outcome of our project and am only sad that there isn't more time to continue improving upon it.

Olivia and me with our project.


Friday, May 8, 2015

Final Project Week 3

During our third week of working on our final project, we focused mainly on the setup of our piece, now that we had the code worked out. I will detail below the many steps we took to get to our final prototype.

Arduino

First we had to set up our Arduino and breadboard with all the correct wiring so that the button, ultrasonic sensor, and motor would all react to our code. This took a bit of rewiring but overall was not too challenging, mainly because we have had so much experience with Arduino in this class. Here's what the final setup of our Arduino and breadboard looks like:


Soldering

Because we were using a sample touch switch to function as our "button" while we tested the code, we now needed to attach our actual button to the Arduino. We learned that our wires needed to connect to the "normally open" setting on the button, which means that no current will flow when the button is unpressed, and current will flow through when the button is pressed. Soldering was one of our difficulties during this project, as many times our first soldering job wasn't strong enough to hold the wires. We also needed to fortify the bond on the ultrasonic sensor we by soldering the wire connection. It was often frustrating because we would have already attached all our pieces together only to find that a wire had broken, causing us to have to cut many wires unnecessarily and reattach them. Here is a photo documenting some of the soldering process:

The Box

Next, we had to worry about setting up the box which would contain all of our parts. It was important that the box not be clear so that the children would not feel tempted to open it and play with potentially dangerous wiring and/or break our device. To ensure that neither of these would happen we decided to spray paint our box an opaque silver.


Further, we needed to make three different cuts into our box. First, we needed to make a small hole in the lid of the box, which would be facing toward the back when mounted on top of the toilet, so that the wire connecting the motor to the battery pack would have a place to come out. We did this using a band saw and a box cutter, then we sanded it down to make sure there were no rough edges. Second, we needed to make holes for the button and the ultrasonic sensor to stick out. To do this we measured their diameter and used a compass to draw the appropriate circles on a sheet of paper. We then taped these paper circles onto the box where we wanted the holes to be. We used a very small drill on the drill press to drill holes along the circumference of each circle. From there we used a box cutter to cut out the circles from the box and finally sanded down the holes to make them smooth and safe. 

After this process, we were able to insert our button and sensor into the box. Here is what the outside of our piece looks like:

We also attached the other components such as the Arduino and battery pack to the inside of the box using both glue and tape. We made sure the battery pack was able to be removed as well so that the batteries could be replaced when necessary. Here is a photo of the inside of the box:
                      IMG_3358.JPG


On my next and final post about this project I will discuss the presentation and demo of our prototype as well as reflect on the process.

Wednesday, May 6, 2015

Final Project Week 2

During our second week working, we focused on getting our code right, which took several tries. Below, I'll detail the steps we took to get to our final code that will be used to make the toilet flush.

Goal: Just to be clear, I'd like to briefly outline what it is we were trying to get our code to do so that the photos and descriptions below might be easier to understand. Initially, we want our code to do nothing. However after a child presses a button, we would like the ultrasonic sensor to begin reading values. If the sensor reads a value that indicates a child is present, the toilet should do nothing for a certain amount of time, allowing the child to leave the stall, and then flush. Additionally, if the sensor does not sense a child, it will flush immediately. Note that the original flush handle attached to the toilet will still work on its own if need be.

That being said, our first iteration of the code was broken down into four parts. First, there is a while statement addressing the situation in which the button is unpressed. The motor stays off during this. Then, once the button is pressed the code breaks out of the while statement and follows a series of if statements. The first if statement adresses the situation when the time is less than two minutes and there is a child in the stall, the toilet should do nothing. Second, if it has been less than two minutes and there is no child in the stall, the motor will flush the toilet. Lastly, if the time is greater than two minutes the toilet will flush, regardless of whether or not there is a child in the stall.


However, this code failed to work when we tested it. The  ultrasonic sensor would only read values when the button was being held down, instead of just after it was pressed. Or, alternately, depending on where we put certain parts of the code, the sensor would read one value when the button was pressed and wait until the code had run through its full loop to read a second value. 

At this point we were concerned with whether or not our button was working correctly on its own. So we made a new code to simply test our button by making the motor function solely as a function of the state of the button. 

As it turned out, our button worked correctly. This told us that our problem was with the Millis function. So, we decided to remove that piece of the code and simply use a delay instead. In addition, we also simplified our code from being in four parts to three. Instead of having three separate if statements according to the time, we now only have two that are associated with only the value of the sensor reading. Our code now states that if there is no child in the stall, flush, and if there is a child in the stall, wait a certain amount of time and then flush. This simplification took us a great deal further on the road to our final iteration. 


Our final code, below, looks similar to the one above but with some adjusted values. After talking to a director of the preschool, we determined the child only needs ten seconds to exit the stall, so that was adjusted in our code. Here is our final version:


For my next post I will discuss the physical setup of our prototype and the different aspects of making it come together.